Monday 31 May 2010

Life Drawing

Here are the last few drawings.


Now all thats left are the Maya tasks. I aim to get those posted by the end of the day.

Sunday 30 May 2010

After Effects

So here are two of the things we ccreated in after effects.

This was done only using a set of 2D cloud images, placed in 3D space, in after effects. Thier blending modes were adjusted as well to create something that looked like the clouds were drifting past. The text was generated etirely in after effects.


The 3D footage was provided. All the 3D objects; the body the tubes the green slimey stuff and the arrows were rendered out separately. The task was to composite these 3D elements together, but to also experiment with some of the other effects in the list.


There were some other things done but were never rendered out. One of the other tasks was to give the animatic a bit more animation. Unfortunately I don't have CS4. My CS3 copy couldn't open them. Even though I had prior knoledge on after effects before these classes, I can say that new stuff was learnt. The 3D stuff, and one very usefull utility in the effects list: the channel combiner. Which basicaly allowed me to geive the alpha channel from one render pass to another. Although by the looks of things, it can also use the other channels.

All usefull stuff. I will probably be posting the last of the life drawing next.

Friday 28 May 2010

The making of the Life Cycle of a Slime Mold

First, here is the final animation.


Well... The final animation recieved positive results. As with a lot of the other animations, there were a few small problems that could... or can easily be fixed. The Life Cycle of a Slime Mold was commented as a project in control... Unfortunately, The Making of The Life Cycle of a Slime Mold was in fact, done last minute! It would have been nice to spend a bit more time on it. Perhaps some small pockets of text to acompany the images. But at two oclock in the morning, I was struggling to even drag the images on the canvas! Still I think the DVD cover came out well.


I'd like to think this is the end of the project, but I still have to finish the maya tasks, which have slowly mounted up. I also need to blog the after effects tasks and the last few life drawings.

Thursday 27 May 2010

DVD Cover and Disc

I've just this minute, finished designing my DVD cover and disc.


Also you may notice that I have a logo on both of them.


That would be my new current logo. I designed it a little while ago and fogot to post it, but well, its here know anyway. My original intent was to design my logo over the holidays, along with the whole blog. Basicaly what I'm saying is, that I don't know how long this logo will last. It may change. It may not. Who knows.

Wednesday 26 May 2010

Introducing a Leaf

It never really noticed in the storyboard but this shot is looking very empty. Just so you know, the camera moves around to the right, to face the twig, which is in effect, just a wall.

But while its facing this direction, I'm thinking it need some sort of background, other than the sky. In theory, the rest of the trees would be seen here, but at this scale, they would look like a big flat brown wall. (as you would only be seeing the tree stump of probably one tree)


I haven't tested this out yet but I'm thinking of putting a leaf in the background. I've created a simple cartoon leaf. Done in the same way as the trees.


I would probably have it on a curved plane surface. I don't know how good it will look. Any other suggestions are welcome. As soon as I've put the leaf into the scene, I'll post it. Right now I'm rendering other stuff.

Monday 24 May 2010

Test Render

Nothing particularly exciting to post today. Here is a very quick render of the slime mold cells comming together. Look left of center to see two cells connecting.


I know its a bit short. Its just a test to see if I could succsefuly composite the passes together.

Sunday 23 May 2010

Something Sucsessful

I've basicaly done the last half of the animation. It just needs to be rendered. Dynamics in maya started to behave and things have prgressed further. Sinse this particular scene needs depth of field (there is a transition from from mid focus to close up), I done a quick test with a single rendered frame.


Its only subtle, but neccesery.

This next video is how the animation looked as of yesterday early evening. The spores don't explode in this version. The scene itself is split up into 5 different camera angles. The last one being this angle. It is suposed to start when the camera starts moving.


Now all that is left is most of the beggining half of the animation. I have a bad feeling that it is the more difficult of the two halfs, but hopefuly now that something has gone right, I will have the motivation to get it done.

Saturday 22 May 2010

Is Maya the problem, or the person using it? I think we all know its the latter

I really don't know where i'm going with this animation now. Practiclay every scene in my animation requires the use of dynamics in one way or another. Not because I want to use dynamics but because it needs it as hand animating it right would be impossible. Creating a sucsessfull dynamic simulation is fine, but intergrating simulations into a full animation is proving very difficult when all knowledge on dynamics has come from only books and internet. I've almost done the last scene, where the slime molds produce fruiting bodies, but the last part of it, shows one of them releasing their spores. I've depicted this as if it were exploding, as in my storyboard. I can't animate 100 idividual spores by themselves, so I thought. "I need to use dynamics". And now, after hours of tweaking, it just suddenly stopped simulating. I didn't even get a chance to cache it. I would rather not be doing all this complex stuff at the moment as my knowledge on this subject is only basic, but I can't see any other way around it. I only wish I could at least show the error message that came up the first time it stopped working, but I can't even get that to come back again.

I could go on listing all the wierd and not so wounderfull things, maya has be doing, although I wont, but one thing I just have to mention. In one of my scenes, whenever I created a camera, (that's just the plain and simple camera) it always came with an invisible aim controller. Yet the controller didnt apear in the outliner. Can anyone explain this? Restarting maya did fixe this, but I'm just curious to know.

I think I seriously need to re think how I create this animation. I hope the next post I have something positive to say.


Actualy I do have one positive thing to say.
I can render the shadows for the desk. By disabling the shadows on the book, the render time was reduced dramaticlay. The ambient oclusion pass takes care of the book.

Thursday 20 May 2010

The tree zooming scene... re done

This is the scene where the camera goes through the forest and zooms in on the twig. I've altered the movement of the camera. This time it does what it was suposed to do. Instead of going right up into the air before it plumets, it mearly looks up before going down. This is how it was storyboarded. It also lasts longer.


The only thing I can see that need sorting out is the lighting. The twig doesn't show up very well at the moment. Especially when its grey.

School Desks and Shadows

My first scene shows the book with the diagram of the life cycle of a slime mold on a school desk.

Here is a render without shadows.


Here is a render with shadows.


Is it worth having the shadows (especialy if they are only simple shadows) if it takes an extra 44 seconds per frame. I'm thinking no, unless I happen to find myself with spare time at the end.

The ambient oclusion renders quick enough, which is visible in both renders. It helps ground the objects to the floor. I may as well just stick with that. What are other peoples thoughts no this.

I've already made the decision not to render this at full hd to further reduce render time. If I can keep the render time to no more than a minute per frame, I should be ok.

Wednesday 19 May 2010

Fully rendered my first shot... and its a disaster


So whats wrong with it? The yellow nucleuses inside don't apear to be spinning in a vortex. (Motion blur may have helpped a bit here, but rendering was too slow) Instead it looks fuzzy. The blob thats suposed to be rising just doesn't look as good as the pre vis. I rendered a depth pass, but it just takes too long to composite in after effects, so it is missing from the video. This means that it is dificult to know what to look at, and the shot itself just doesn't work. Whats worse is I din't notice this untill after I rendered it, which also to far longer than I expected. (The whole day) Whats even more worse is the fact that it isn't an overly complicated scene to render. Just three simple meshes with two simple textures. And now with only 9 days left to finish, I'm going to have to be completing (including rendering) 2 shots each day out of the 16 shots I have. I think now is the perfect time to panic.

Oh and as usual... youtube has cut off the end of the shot.

I welcome peoples thoughts, or maybe advice.

Saturday 15 May 2010

This is the final Animatic

I've tweaked my animatic. I think I've fixed the beginning shot now. Technically I haven't made the shot last any longer, but I've adjusted the length of the boards themselves, within the same amount of space on the timeline. I also adjusted the whooshing sound, so it starts earlier.

Thursday 13 May 2010

I'm on a CG arts course... and designing Science text books!!!

I've spent the last half of today working on something I would never have imagined doing on a CG arts course. Creating one double page spread in a science text book on slime molds, complete with text and images. For those that don't know, this is needed in the opening and closing shot of my animation. The choice of colours and style is done to match the world of my slime mold animation. Well... technically it's the other way round, but I've worked backwards...


I did have a look at exaples of how text books can be set out. Not much reference material was found, all exept these images.


All of my science text books got chucked out after school so it was mostly up to what what sort of things I've seen before to use as reference.

I think I've explored and experimented enough with this style of colour and texture to be satified with how its going to look in the final animation.

2D Forest in 3D... although not in actual 3D

I've put the trees in the Forest Pre Vis shot. The animation hasn't been changed but it will be slowed down a bit and lengthened in the final animation.


Any more posts today and I'll run out of envelopes!

Trees in diagrams

I went and trasfered this painty style into the 2D trees that are at the beggining and end of the animation. Perhaps a bit too foggy here and the black outlines, I think should actualy be a darker brown and green. It gets the idea aross though.


I was looking to see how trees are drawn in diagrams. I typed in diagram trees in google and although a lot were black and white, there were a few colour ones. These ones show properties such as the outline (thick and thin), the simple colours that are sometimes slighlty pale. Similar to what I was going for in my trees.


I think I've decided... the thick black outlines have to go. Then I will put the trees into the pre vis shot where the camera flys through the forest, and see what that looks like.

colour makes all the difference

I ajusted the textures once more and I think this is a better representation of my style in concept art in 3D form. The colours in the background are now visible but still pale in comparison to the foreground, which is good.

Texture Style Tests

Yesterday I was experimenting with painting textures in photoshop. Trying to be similar to my concept art style. Anyway, these are the results. I'm not exactly pleased with the results despite all the adjusting that the textures went through. The renders just look dull and CG. Perhaps the textures are too pale and the contrast needs to be brought up a bit. A second opinion would be helpful.

Oh and the blobs won't look like plain old spheres


Here I've put the blob shader on the test animation shown at pre vis. This doesn't look to bad but then I did adjust the contrast in after effects. The original render came out pale as before.


These are the textures used. They aren't tileable though. These tests are all about colour and overall appearence.

The blob texture


The floor texture (twig)


The background texture


Phil. Does the new animatic get your aproval?

Wednesday 12 May 2010

Life Drawing

This is yesterdays life drawing.


The first few quick sketches aren't that good but the second hour and a half pose picture came out better. Although there was a lot of correcting.

Animatic Version 2... Hopefuly better pacing

I've ajusted the timeing in this animatic. I think its something like four shots that are held a bit longer and the begining has an extra board. This has meant that the music has had to be ajusted as well but I don't think anyone will notice the join where it is looped. Feedback on this is most welcome.


And while I wait for some feedback, I'm going to be testing a few different styles of texturing for my animation. Phil showed my this amazing example of how you can make a 3D envirnment have the style of a 2D sketch. (At this blog
http://davidkeefe-finalmajor.blogspot.com
)

I wasn't sure whether to go with a pale digital painty style or a sketched style. One thing I was thinking of yesterday was that if I was entering this diagram in a text/revision book, that the envirmont would be textured in a printed (digitally painted) style but if the evrionment was to be sketched, the book we would be going inside would be more like an exercise book (I guess were someone does their science homework).

If you look at the extra story board at the beggining of the animatic, the book is on one of those old fashoned wooden desks. It may be that the desk and the book itself are the only things in the animation that look reralistic as we would be entering from the real world to the diagramatic world.
Anyway, these were just some of my thoughts while the animatic was uploading to youtube.

Monday 10 May 2010

Finished Concept and everything else shown from pitch

Here is the last bit of concept art.


This is the animatic of the slime mold that was shown at the pitch. It recieved positive feedback; the only thing that was mentioned was that it seemed a bit rushed in places and so some shots need to be held on screen for longer. It also needed the first shot (of the book) to start further away so that it is 100% clear as to where the camera is going into. I've already started adressing these minor faults and will post that as soon as its done.


Here are the pre vis shots showing some of the more complex camera movements and angles, that are difficult to describe well in a storyobard.


Sunday 9 May 2010

The Final StoryBoard

Here is my final story board.


There has only been one main change from the rough storyboards. If you look at the part where the slime molds are all fruiting (from board number 25), This shows the camera pivoted on the spot, rotating and showing the landscape, with a fruiting body that grows right in front of the camera. This was originally going to be shown with the camera zooming past the fruiting bodies, but I decided to change this because the previous shot shows the camera coming up in the same direction (board number 19). I could have just continued that shot into the next seamlessly but I wanted a pause. That way I could show this buildup, where one blob starts to fruit... then another... and another and another and so on (between boards 20 to 24). I think that the next shot (25) seemed to fit better than the older shot where the camera was zooming past. The only downside I can see with this is that the zooming shot was supposed to reflect back to one of the previous shots where the camera is zooming past the trees (board number 3).

If any of this is making sense, I'd like peoples thoughts on this.

Wednesday 5 May 2010

Concepts

I've spent my time on concept art yesterday and today. My first scene is where the cells come together to form the slug body. I've made it look like the cells are being pulled into a tornado of slime. All the yellow specs inside being the nucleus's of the cells. I've ended up naming this piece The Tornado of Cells.


My first attempt I wasn't happy with for two reasons. the angle of the camera was wrong and it looks very photoshopped. I had a million and one layers which wasn't helping. That's why I've kept layers to a minimum from then on. It wasn't finished.


I've had a couple of attempts at creating this scene. It depicts a lot of fruiting bodies ready to release spores on this large twig. (it is that much of a close up) Since it will be reflecting the beginning scene in compositional terms. (where the camera pans through the forest)
I've named this one as well... The forest of Fruiting Bodies.


I've abandoned working on this picture, just because it seemed rushed and doesn't have good composition.

This second one is a work in progress but I will keep at it as it looks promising.


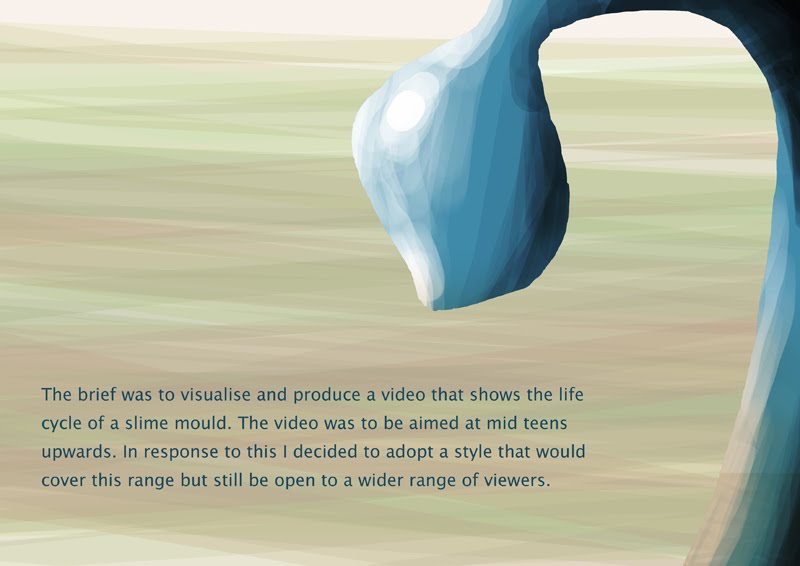
This last image has been a pain to create. It is a close up of the releasing spores. These first attempts were a bit simple. When I saw my first attempt compared to the final, I was rather reluctant on even showing it. You can see why...


I don't know why but when it comes to digital paintings, I sometimes get these off days where it becomes impossible to do anything right!

What was annoying was the second attempt actually came out half decent only to become corrupt. Nevertheless, I started again and came out with something even better and am happy with the final result. This one is so much more of an improvement and is, in my opinion, the most detailed. If you look very closely, the body is slightly transparent.


I just thought I would go over how this image was done.

I started by painting a blue sphere.


On a new layer, I drew a selection where I wanted the holes and filled it in with black
I then shaded it a darker blue


Then a mask was created in the center area so that I could paint in the yellow spores and would appear to go inside.
The spores were shaded


I then painted on the spores on the inside and lowered the opacity.

A background was painted with earthy colours

One final tweak was to change it from a sphere to the shape of the fruiting body using the liquify tool.


And that's it.