
Dynamics - Week 2
Softbody - Flesh

In this example the skin around the chin has been made a softbody. A softbody controls mesh with a particle for every vertex. The particles around the chin have been weighted so that they are attracted to a copy of the original mesh shape. By making it, for example, half weighted, the flesh around the chin wobbles. We have control over a few other attributes to fine tune the effect.
Softbody - Cloth

The cloth has been made a softbody. The ball collides with a dummy plane just underneath the cloth plane. the particles in the cloth collide with the ball. The particles conserve is set to zero to leave an imprint.
Softblody - Snow

The snow plane has been made soft. This is similar to the last example. The particles have been made to collide with the shoe. With the conserve attribute set to zero, the particles stop moving after the release of the shoe.
Softbody - Water

Here a water plane has been made a softbody. This has been made to ripple like water with the use of springs make the motion of the ripple travel.
Softbody - Bubbles

Here the bubbles are begin deformed by their own individual lattice deformers. The lattice deformers are softbodies that are being affected by dynamic fields.
Here is a video showing the above effects.
Dynamics - Week 3 to 4
For The last two weeks we looked at the nDynamics System in Maya. nDynamics divides into two parts. nCloth - for cloth simulations. nParticles - for advanced particle simulations. The beauty of this system is that the particles and cloth work together, so particles can have an effect of the cloth as much as the cloth can have an effect on the particles. The particle system is even more advanced than the standard particle system in Maya, as it has additional features.
The first task was a introduction to cloth with a pretty standard set of flags blowing in the wind.
The flags were made cloth objects and the wind atributes in the system node (nucleus) were set accordingly.

The second example show how we can cache two simulations and blend between the two. In the first cache the bouncy castle was set to be deflated. Then in the second, to be fully inflated.

This example shows how a simple piece of cloth can be used to influence a more complicated piece of mesh. The netting (made up of cylinders with lots of polygons) is influenced (by wrap deformer) to a flat piece of cloth (hidden). Some nParticles were added into the scene for the netting to collide with.

This next example was particularly complicated. A combination of techniques was used here to achieve a dynamic rope bridge. two plat planes were used (one above the other) representing the lower and upper ropes. The ropes and planks are influenced by the cloth planes. The vertical ropes are constrained by both ends of the horizontal ropes. The cloth planes are held at both ends by transform constraints.

Here is a video of the above effects.
Yeah, I went a little further and experimented at destroying the rope bridge. It worked surprisingly well.
Now for the last three examples.
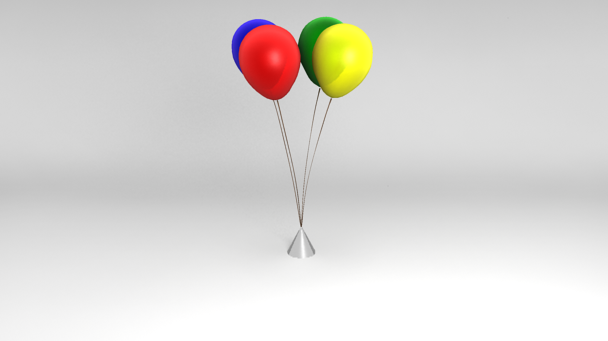
The first demonstrates how you can use cloth to simulate other objects such as balloons. The string has its own settings as does the balloons. They are constrained together at the join with a component to component constraint.
This example demonstrates a very powerful aspect of the cloth simulation. You can make tear-able surfaces. We can control the exact time in which the cloth tears by animating the glue strength on the cloth.

A similar thing can been seen here as the bag splits apart. nParticles have been filled inside the bag and have an M&M instanced to it.

Here is a video of the above effects.
Match Moving - Week 2 to 4
Week 2 Automatic tracking
This example shows what automatic tracking can achieve. The spheres are added in to test how they match in the shot.

The software detects where the camera is moving and reconstructs it by following points of high contrast (in theory). The downside to this is that it can't distinguish between static objects and moving objects so anything that moves has to be masked out to avoid the software getting confused.
Target Tracking
In this example I have manually picked the points for the software to track. I've picked several points from varying distances to the camera so that the software has enough information to calculate the approximate perspective and movement.

Masked auto Track
This example shows how masking the tracking area can localise the automatic tracking calculations. This has been done in reverse so instead of the tracker calculating the camera movement, it is tracking the movement of the car.

And so this car has now been turned into a wind up toy car!
High Res Body Modeling - everything for this year
The head


The Body


So next year we will be finishing it, with the feet, arms and hands. There may be one or two areas that need a little clean up or more detail, but it's at a good stage so far.
For any previous tasks view the Maya Tutorials link to the left of the page.
A Flock of Pixels
No comments:
Post a Comment